My Many Mini-Minicomputers

Hey, do you like old minicomputers? How about scale-model minicomputers? Well, you’re in luck!

The University of Waterloo’s Computer Museum graciously invited me to speak at their Open Hardware Day event on June 18, 2024, and the ensuring presentation “My Many Mini-Minicomputers” is now available on their YouTube channel if you’re interested in some animated rambling about modern simulation of DEC machines of the ’60s and ’70s. I also guarantee a computer will fall over on camera at least once before the whole thing is said and done.


Disk Cloning: It Really GRUBs Me The Wrong Way

I recently ran into an odd GRUB-related issue after using Macrium Reflect to clone a 120GB SSD containing a Linux Mint install to a larger 250GB drive.

Any attempt to update or install packages returned the following error from the package manager –

Setting up grub-efi-amd64-signed (1.187.6+2.06-2ubuntu14.4) ...
mount: /var/lib/grub/esp: special device /dev/disk/by-id/ata-Samsung_SSD_850_EVO_120GB_S21TNSAG124403L-part2 does not exist.
dpkg: error processing package grub-efi-amd64-signed (--configure):
installed grub-efi-amd64-signed package post-installation script subprocess returned error exit status 32

In addition to the obvious hassle of pop-up errors from the graphical update manager, this also affected my ability to install some additional software that relied on the package version in question. It needed to be fixed, and a wipe-and-load didn’t sound like a pleasant option.

A bit of research into the specific error code being thrown revealed that the issue likely related to the ESP (EFI System Partition) flag not being set on the new, cloned boot drive for the Linux installation.

Off to parted we go –

(parted) p all

Model: ATA Samsung SSD 850 (scsi)
Disk /dev/sde: 250GB
Sector size (logical/physical): 512B/512B
Partition Table: gpt
Disk Flags:

Number Start End Size File system Name Flags
1 1049kB 250GB 250GB ext4

Yeah, there it is. Let’s select the drive and set the ESP flag –

(parted) select /dev/sde
Using /dev/sde

(parted) set 1 esp on
(parted) p

Model: ATA Samsung SSD 850 (scsi)
Disk /dev/sde: 250GB
Sector size (logical/physical): 512B/512B
Partition Table: gpt

Disk Flags:

Number Start End Size File system Name Flags
1 1049kB 250GB 250GB ext4 boot, esp

(parted) quit
Information: You may need to update /etc/fstab.

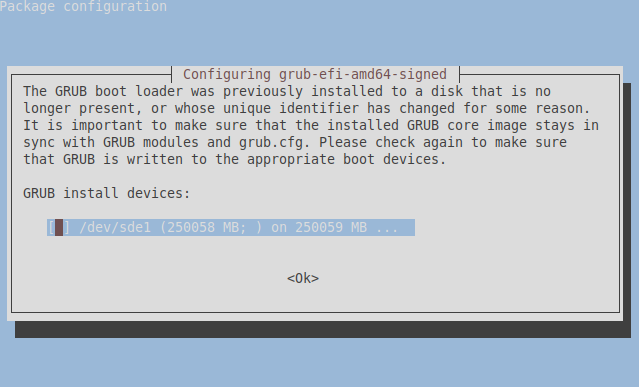
This was followed by a sudo apt –fix-broken install to get the troublesome package installed and configured. This returned two ncurses-style screens, one of which essentially confirmed the cause of my issue –

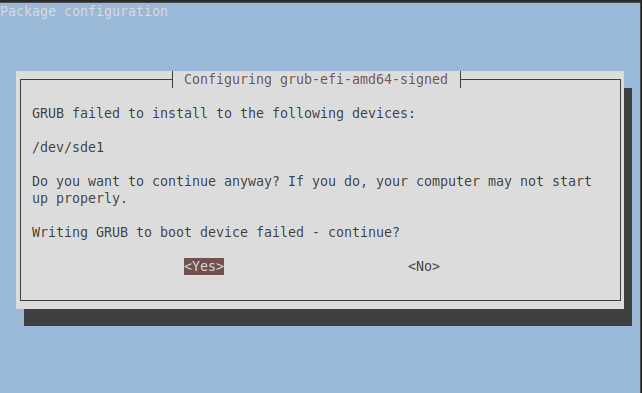
 The second was a warning message that didn’t seem to make a difference in the end –

I’m uncertain why I saw the second error, as GRUB seemingly worked fine from the specified device after a quick reboot to ensure I hadn’t unintentionally wrecked my boot drive.

I’m curious whether this whole mess could’ve been avoided by doing a dd of the two drives instead of relying on Macrium Reflect (a convenient, yet hefty, pricey and proprietary piece of work in itself). There’s something to be said about using the right tool for the job..

A solution for Teksavvy modem connection drops in FreshTomato

A family member has struggled in past months with an issue where their Teksavvy cable modem’s WAN connection will drop irregularly (usually overnight), cutting their network off from the Internet and necessitating a power-cycle of the connected router. Neither the cable modem or the router appear to be overheating, crashing, or freezing at the time the issue occurs. It is not necessary to reset the cable modem, nor does resolving the modem alone resolve the issue. Nothing useful is noted in the router logs at the time the issue occurs, and a couple of previous tech support calls have yielded very little help in pinpointing the issue’s root cause. Beyond the inconvenience of reaching behind a router to toggle a power switch, the power cycle usually takes 3-4 minutes to complete and also affects local network connectivity between their many household devices while the router is restarting.

Based on some of my previous advice, this family member began using FreshTomato and naturally came calling for a simpler solution within the router’s web config.

With some basic initial troubleshooting, we verified that a DHCP release/renew of the WAN connection on the router was enough to restore connectivity. Though this drastically reduced the time and effort needed to bring the connection back online, we decided to automate the process, using the router’s Scheduler panel to set up a task that ensures the connection stays up wherever possible.

Our solution was a simple bash script that pings a known external IP address or domain (say, Google) every 3 minutes – if the ping fails, the script restarts the router’s WAN service and “bounces” the corresponding interface.

ping -w 2 -c 1 google.com > /dev/null; if [[ $? != 0 ]]; then service wan restart; fi

The -w and -c switches specify a 2-second timeout (we don’t want the command hanging too long) and 1-packet ping (lest we be stuck pinging forever when using the Linux ping command).

This approach has seemingly worked well for the affected individual thus far, but doesn’t come without its own caveats. If the target of the ping experiences issues of its own and stops responding, the router’s WAN connection will stop/restart every 3 minutes as result. As a fail-safe, we can account for this flaw by implementing an OR statement to ping an extra IP/domain and keep the WAN connection up as long as one of the two respond. Alternatively, you can simply tune the frequency of the command to run less frequently – once or twice a day may be sufficient depending on your use case.

Though we made use of FreshTomato’s web config, you could always use a similar approach on any Linux/Unix-based router via crontab (FreshTomato is Busybox-based and doesn’t use cron specifically). I’ve now heard of this issue a few times as it pertains to Teksavvy and hope this post will catch the eye of a few perplexed Googlers as a result – however, this can just as easily apply to any cable modem with the same issue as those described.

TLS 1.0 and Discord Woes

I recently ran into an issue running the Discord VoIP/chat application (version 0.0.308) after completing some security hardening on one of my Windows 10 PCs.

On startup, the Discord client first checks for updates, then automatically downloads and installs them where necessary before launching the application. While this process had previously worked flawlessly, I suddenly found myself stuck in an endless loop of the software trying to update itself and failing to do so. The update check would then go into a 60 second timeout before repeating the process, and the application would never launch as intended.

I first tried several fixes as recommended by Discord’s support site, including the standard uninstall/reboot/reinstall of the software, deleting the Discord folders within %APPDATA%\Local and %APPDATA%\Roaming, elevating to admin to run the software, and bypassing my firewall. No luck! The issue persisted despite my efforts.

Finding my way back to the Discord application folders, I checked %APPDATA%\Local\Discord\app-0.0.308\Squirrelsetup.log and found this error –

9788> 2020-09-11 18:01:55> IEnableLogger: Failed to download url: https://discord.com/api/updates/stable/RELEASES?id=Discord&localVersion=0.0.308&arch=amd64: System.Net.WebException: The request was aborted: Could not create SSL/TLS secure channel.

TLS, huh?

I had previously disabled Transport Layer Security (TLS) 1.0 via a registry key for security purposes and recalled that Discord had been working fine up to that point. For the sake of testing, I re-enabled it and re-ran Discord – problem solved.

I was happy that the issue was fixed, but disappointed to discover that this was the root cause. While the error message itself was straightforward (once I was able to find the proper log file), TLS 1.0 is a 20-year-old deprecated protocol with known security vulnerabilities, and I can’t imagine a valid reason for Discord’s developers to continue to insist on its use when newer and superior alternatives are available.

As a best practice, I eventually decided to disable TLS 1.0 once again and will be sticking to the browser-based Discord client (which doesn’t require updates) for the foreseeable future.

Building the PiDP-8

With the growing popularity and computing power of the Raspberry Pi single-board computer, many engineers and vintage computer enthusiasts have begun exploring the Pi’s viability as an emulator for legacy minicomputer and mainframe systems. The open nature of the platform’s hardware and software lend itself well to emulation projects, and the board’s GPIO connector allows for a wide variety of interfacing possibilities for peripherals and I/O.

The PiDP-8 kit from Oscar Vermeulen takes advantage of these features by making use of a Raspberry Pi, the SimH emulator software, and a wooden enclosure with LEDs and switches to simulate the DEC PDP-8/I front panel and run the PDP’s OS-8 operating system.

First Impressions

Shipping was quick! The kit found its way from Europe to North America within 3 days, even with a local holiday adding to the turnaround time. The contents were packaged impeccably, with the acrylic front panel covered in protective film to prevent damage. The parts I received were all high-quality, and there were no cosmetic defects or faulty components to be found.

Unboxed PiDP8 Kit
The unboxed PiDP-8 kit.

The kit does not include a Pi, but supports all models with the exception of the now-antiquated Pi A and Pi B. I used a spare Pi 3B as I wanted to take advantage of the “glow” effect on the front panel LEDs to simulate the PDP-8/Is incandescent lamps –  this feature was not supported on the lower-cost Pi Zero and Zero W.

Preparing the Pi

Material satisfaction aside, it’s vital to note that the PiDP-8’s SimH emulator doesn’t require a front panel to work, and the simulated PDP-8 system can be used in a Linux terminal session on a bare Pi. Initial configuration is a simple process, especially if you have a little experience with the Raspbian setup utility. I used Balena’s Etcher utility on a Windows laptop to write the pre-fab PiDP-8 image to a Micro-SD card, though the software can also be manually installed on an existing Raspbian system if necessary. Once the SD card was prepared, I connected a HDMI monitor and USB keyboard to the Pi, logged in, and changed the default password for the pidp8i user account.

Next, a little work was needed to enable remote access. The sudo dpkg-reconfigure openssh-server command generated SSL keys, and the raspi-config utility was used to enable the SSH service and configure the Pi’s Wi-Fi connection. I also took this opportunity to name the host and edited /boot/config.txt to disable the Pi 3’s persistent undervoltage warnings, as I wasn’t concerned that my power supply would perform poorly with the device given the low power requirements of my application.

Spacers, Switches, Soldering, Satisfaction

With the Pi setup complete, I set it aside and began work on the front panel PCB. Populating the PCB, while not particularly difficult in general, was admittedly a bit of a tedious journey. To put an optimistic spin on the process, less-experienced hobbyists should look at this as a great opportunity to develop basic kit assembly skills by repetition. Bending pins, aligning components, double-checking polarity, soldering, snipping, and testing continuity are all covered along the way.

Diodes and resistors came first – 27 and 15 of each, respectively. I made sure to populate the diodes as instructed by the polarity markings printed on the PCB. I also used a strip of masking tape to help hold these components in place before soldering, as the pins are thin and slip out of the PCB easily.

Next, I set about populating the LEDs, which are supported by an assortment of thin plastic spacers. Again, there are a lot of LEDs to solder (89 in total), and care must be taken to ensure that their polarity is correct. The kit includes an LED cover bracket that helped ensure proper spacing and alignment.

PiDP-8 board populated with LEDs.

I followed up by installing the IC socket and GPIO pin header that connects the Pi and PCB. I’d recommend a little clear tape over the IC socket before soldering the first few pins, similar to that used with the diodes and resistors, as it’ll slip out of the PCB otherwise. The GPIO header was an easy solder job with its thicker pins, despite its smaller pin spacing.

Mounting the Pi was easy enough, though it was a bit difficult to affix the plastic mounting nuts onto their stand-offs. I suspect the threads were a little off, as I did have to use more force than expected.

Time for an LED test! It looked really cool, worked on the first try. and I was overly pleased with myself (don’t worry – my ego will be deflated before long).

Positioning and soldering the switches was by far the most difficult step in assembly. Some of the thicker mounting pins were bent slightly, and I had to straighten most of the switches using a pair of needle-nose pliers before affixing them to the PCB. Though the official instructions recommend soldering only one of the mounting pins and the three leads, I’d recommend soldering all mounting points on the PCB to add stability.

Final Touches

With the board assembled, it was time to connect the Pi and place the kit in its wooden case. I drilled a hole about 1.5cm in diameter through which I threaded the USB Micro-B cable used to power the Pi. I intended to keep my back panel as simple as possible, and this was the only cable used, though there are a multitude of options for Ethernet connectivity, serial console connections, removable connectors/cables, and almost any peripheral one could imagine to interface with the Pi.

Finally, I affixed a couple of small wooden support blocks to the inside of the case, drilled a few mounting holes, screwed the  PCB assembly into the holes, and laid the acrylic front panel into the case. Project complete!

I then realized I had removed the LED cover bracket and forgotten to re-affix it before I finished the build. Oops. Can’t easily remove the front panel to get to it, either. Double oops. Luckily, it’s not an essential component, and the finished product still looks fine without it. I feel this highlights an important caveat of the project – the front panel is tension-fitted to the edges of the case, and it’s very difficult to remove without cosmetic damage once it’s attached. I decided against removing it and elected to leave my assembled kit as-is.

The finished PiDP-8 kit.

To conclude, this was a fun and functional build that can be used to teach basic kit-building skills, use of the Pi, as well as OS-8 and the PDP-8’s software environment. I won’t go too far into specifics, but there are a lot of fun games and utilities included on the disk images linked from the PiDP-8 site, and I’d highly recommend taking a look. Vermeulen offers a similar PiDP-11 kit that’s a little more pricey than it’s predecessor, but boasts a molded plastic case reflecting the 11’s more “space-age” aesthetic. I’ll be picking this kit up in the near future and hope to put together a similar review and build report once it’s assembled.

Obsolescence Guaranteed: PiDP-8/I (Official Website)

fwupd, LVFS, Firmware Updates, and Your Linux System

Though the security and performance benefits of regular software updates are well-understood by most users, many IT departments and home users have traditionally treated the application of firmware updates as a reactive measure instead of a best practice. Unfortunately, this failure to maintain BIOS/UEFI firmware can result in compatibility issues when new hardware components are added to a system. Furthermore, recent hardware-focused security vulnerabilities such as Spectre and Meltdown have underscored the importance of ensuring that firmware is up to date.

fwupd is a daemon developed and maintained by Richard Hughes (of GNOME project fame) for the purpose of managing the installation of UEFI firmware updates on Linux-based systems. This is helpful for a user base that has traditionally struggled with updates delivered by hardware manufacturers as Windows or Mac OS-only executables.

fwupd was installed by default on my Mint 19.1 system and has been available to Ubuntu users since 16.04 LTS. Users of Red Hat-based Linux distributions need not despair – I found the software could also be installed in CentOS 7 using the yum utility.

Usage is no more complicated than updating software on the command line. fwupdmgr get-updates lists updates available for any connected devices on the system, while fwupdmgr update installs these updates.

This process applies not only to the base system firmware, but to connected peripherals as well. For example, Dell offers support for firmware updates pertaining to their line of docking stations, while Jabra and Logitech offer updates for their wireless devices.

Though many system manufacturers include some ability to flash the system’s firmware at boot time, fwupd can install some updates immediately without rebooting. If an update cannot be performed immediately, it is staged and will be installed the next time the system restarts.

Many popular Desktop Environments offer front-ends to further simplify the update process. GNOME supports fwupd through its GNOME Software Manager, while KDE includes support through their Discover utility.

To assist users running fwupd, the LVFS (Linux Vendor Firmware Service) project serves Linux-friendly firmware update packages and allows vendors to upload these packages free-of-charge. Vendors lending their support to the LVFS project include Dell, HP, Intel, Lenovo, Logitech, and NEC.

While fwupd and LVFS’ device and manufacturer support already looks promising, further buy-in from hardware vendors will be critical to the project’s success in the years to come. Several major motherboard manufacturers such as ASRock and SuperMicro are still in the process of testing fwupd and LVFS, while other companies such as Apple have offered outright resistance to firmware updates in Linux in order to reinforce their push of the Mac OS on their product line. These manufacturers’ financial interests would seem to steer them toward a service of this sort, as the still-growing market of desktop Linux users will likely be more inclined to purchase hardware from vendors allowing them to enjoy the advantages of current firmware.

Analyzing The SparkFun USB Breadboard Power Supply Kit

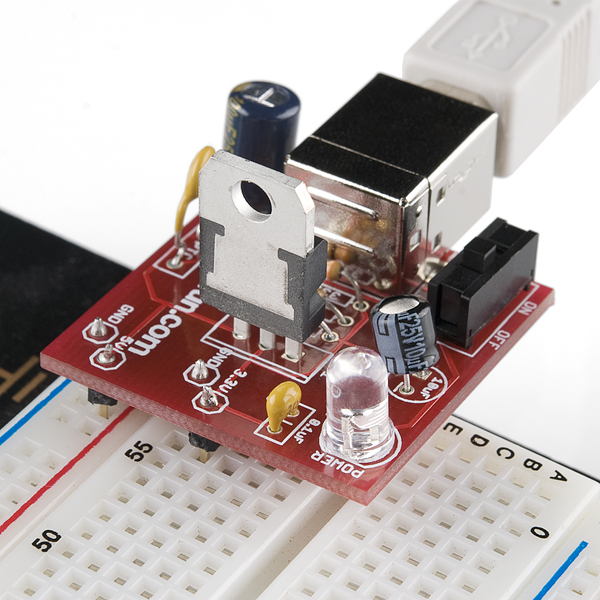
As part of a batch order through Digikey, I recently picked up SparkFun’s USB Breadboard Power Supply kit. This is a small and convenient drop-in module that connects to a breadboard and provides 5V and 3.3V power sources through a USB 2.0 Type-B connector.

Though I had a great time building and using this kit, I also wanted to provide an analysis of the circuit as I feel it could use some documentation for the novice kit builder at which it is targeted. While this is a fairly simple kit to work with, I had trouble finding step-by-step instructions and think it’s important for a kit of this sort to educate the builder while serving a practical purpose.

Here is the schematic provided by SparkFun:

Let’s start at the left side of the image with the USB input. The USB 2.0 standard specifies a power source of 5 volts at 500 milliamps. The 5 volt line is connected through an SPDT-style slide switch. The 2 data pins on the USB plug are left unconnected as they don’t serve a practical purpose in this circuit.

From here, we have two more components between the 5V input line and the LM317 input pin. R3 is a PTC-type resettable fuse – this is similar to a thermistor and serves as a protection mechanism for the circuit. If the amount of current delivered exceeds 500mA, R3 will cut the input line until the overcurrent is removed. Capacitor C1 then serves as a filter to cut high-frequency noise or “ripple” from the input power source.

The circuit centers around the LM317 voltage regulator. This 3-pin IC can output up to 1.5A of current at voltages ranging from 1.2V all the way up to 37V. In our application, it’ll accept the 5V source from the USB connector and output 3.3V from its output pin.

The LM317 uses two resistors labelled R1 and R2 to set the 3.3V output voltage. This voltage is determined by the formula V = 1.25V * (1+R2/R1). Substituting the values of our resistors, this gives us 1.25 * 1+(390/240), which equals 3.28125 volts, which is within a 1% tolerance of our target of 3.3V.

The resulting 3.3V line is then connected to two capacitors. C2 and C3 are 10uF and 0.1uF capacitors respectively and are intended to provide ripple rejection and improve transient response.

Completing the circuit, we have two more branches – one is to our power LED, which is marked as LED2 and is protected by a 330 ohm resistor labelled as R4. Finally, the other branch leads to JP3, which is our final 3.3V output.

I don’t have too much to say about the actual soldering process – it’s fairly straightforward and should be a reasonable challenge for a novice. I would mostly suggest being mindful of the orientations of the polarized components – those are the LM317 voltage regulator, power LED, and electrolytic capacitors. There are two helpful guides for placing the components, those being the schematics, and also the markings on the PCB.

Beyond the more obvious applications of this circuit, we should now also have a good idea of how this type of design could be adapted. For instance, we could swap the USB input with a 5V DC power supply connector, or we could alter the output voltage by replacing our two adjustment resistors with a pair using different resistance values. I suggest taking a look at the LM317 datasheet provided by Texas Instruments, as it provides some additional sample circuits and describes how this power supply could easily be converted to a battery charger with the addition of a shutoff transistor.

To sum up, this is a great starter kit with practical value that can be had for under 20 dollars. In my case, I already have a computer with a USB port sitting on my bench, so I no longer need to use up an AC outlet for a wall wart power supply. It’s great for anyone needing a quick 5V or 3.3V power source to their breadboard, and is an excellent way to learn about basic power supply design and the use of the LM317.

You can purchase the kit here – https://www.sparkfun.com/products/8376

On to RHCE

I recently scheduled my RHCE exam for February, meaning I’ll be spending the next month studying the course material and ensuring I have the necessary skills under my belt. I had originally intended to complete the test last July, but suffered from burnout following an extended period studying for RHCSA and was forced to re-schedule.

IT certs and self-paced learning can be tricky. They require a strong time commitment and can often be overwhelming in their breadth. The educational market is flooded with 1000-page study guides for 20-objective simulation-based exams, and it’s sometimes difficult to separate the essential portions from the “fluff” or extraneous topics. Further complicating matters, test objectives may not always reflect the most common tasks for a sysadmin or engineer, leading to frustration and resentment over failed exams.

While I’m generally interested in the topics I study, I always find myself fighting distraction. Studying is rewarding, but it’s easy to get pulled astray by the instant gratification of unrelated reading, video games, and the like. Sometimes personal circumstances get in the way as well. This leads to under-preparedness, and if the student’s confidence isn’t there, the natural inclination is to re-schedule the exam rather than fall short and waste the money spent on registration.

Pacing is also important: over-studying can also be detrimental, and the student should ideally prepare with a degree of desperation and eagerness to learn in a short period. If I set my test date too far in the future, I’m more likely to skip study days and feel less motivated by the time the test rolls around.

I feel that personal accountability is the main tool to combat these challenges. Announce your intent to write an exam on a certain date to your friends, family, and boss. If possible, join a study group, or find others writing a similar exam and offer peer support. Many computer-based training sites will offer some sort of scheduling to go along with their course material – take advantage of this functionality, make a schedule, and hold yourself to it.

Past experience has shown me that a little luck goes a long way as well.

As a study aid, I’ll be adding a few short, RHCE-relevant articles in the next while. Though there’s no shortage of information on the exam topics available online, I still hope that they will be helpful to prospective students and sysadmins.

SSH Tips: Key-Based Authentication, Remote Commands without Interactive Login, and SSHFS

SSH is an important and commonly-used tool for remote shell access to Linux and Unix systems. This post will cover some tips for effectively using SSH and the closely-related SSHFS to run commands and access files on a remote host.

We’ll work with a pair of client and server computers running a Red Hat or Debian-based Linux distribution, then configure key-based authentication between the two. We’ll then use SSH to login to the server from the client (without using a password!), look at how we can run commands on our server without interactively logging in, then use SSHFS to remotely mount the server’s filesystem to our client computer. Most of the commands described will need to be run with superuser privileges, either by prefacing them with sudo or using the su command to switch to a superuser account.

Key-Based Authentication

First, we’ll want to ensure the SSH daemon is running on our server with the systemctl status sshd command. If the sshd service is not running or enabled, we may need to start it on a one-off basis (systemctl start sshd), enable it (systemctl enable sshd if we want the service to start persistently in the future when the server is rebooted), and/or install it (if it’s missing entirely – yum install openssh-server for Red Hat-based distros or apt install openssh-server for Debian-based distros should do the trick in this case).

Once we know the sshd service is running on the server, we can head back to our client to configure key-based authentication. This enables us to store a private encryption key on the client side, upload a corresponding public key to the server, then use these two keys to authenticate and communicate via SSH with the server.

The ssh-keygen command generates the private and public keys (using a random “seed” value), then prompts us to secure the key pair with a passphrase. This is not necessary, but can be used to provide an additional layer of protection.

user@CLIENTPC:~$ ssh-keygen
Generating public/private rsa key pair.
Enter file in which to save the key (/home/user/.ssh/id_rsa):
Enter passphrase (empty for no passphrase):
Enter same passphrase again:
Your identification has been saved in /home/user/.ssh/id_rsa.
Your public key has been saved in /home/user/.ssh/id_rsa.pub.
The key fingerprint is: (fingerprint here)
The key’s randomart image is:
(randomart image here)

Next, we use the ssh-copy-id command to upload the public key to the server. The key is stored in the ~/.ssh/authorized_keys directory for the target user account on the server.

user@CLIENTPC:~$ ssh-copy-id user@SERVERPC
/usr/bin/ssh-copy-id: INFO: Source of key(s) to be installed: “/home/user/.ssh/id_rsa.pub”
/usr/bin/ssh-copy-id: INFO: attempting to log in with the new key(s), to filter out any that are already installed
/usr/bin/ssh-copy-id: INFO: 1 key(s) remain to be installed — if you are prompted now it is to install the new keys
user@SERVERPC’s password:

Number of key(s) added: 1

Now try logging into the machine, with: “ssh ‘user@SERVERPC'”
and check to make sure that only the key(s) you wanted were added.

Once this is complete, we can edit the /etc/ssh/sshd_config configuration file on the server to enable authentication using a key pair without the use of a password. This carries the advantage of preventing unauthorized individuals from logging into your account by guessing your credentials, as well as saving you the hassle of remembering an extra password.

The lines to change in the configuration files are as follows –

ChallengeResponseAuthentication no
PasswordAuthentication no
UsePAM no

Once these changes are saved, restart the sshd service using the systemctl restart sshd command to apply your changes. Future logins via SSH from your client machine to the corresponding account on the server will no longer require a password to be entered, as the client is authenticated and communications are encrypted using the private/public key pair.

It is important to note that this change affects all users, and key-based authentication will be required once these changes are made. If you lose your private key, you’re unable to log in via SSH until the config file on the server is edited to re-enable password authentication.

Remote Commands without Interactive Login

While SSH enables interactive login to a host machine, this isn’t always necessary or preferable. We may only need to quickly run a single command on a server, in which case we can pass it as part of our SSH connection string –

user@CLIENTPC:~ $ ssh user@SERVERPC echo “Hello World!”
Hello World!

Note that the output of the command is streamed to the console of the client machine specifically. For this reason, if I had passed ssh user@SERVERPC echo “Hello World!” > myfile, the “Hello World!” output would have been saved to a file called myfile on the client PC, not to the server.

At face value, this doesn’t seem to be much more than a marginal time-saver. However, this also enables us to script commands to be executed on a remote machine (or machines) in sequence. For example, I could write a script to query for free disk space on a series of servers and save the output to a single text file on my client machine.

SSHFS

One of my favorite SSH-related tools is SSHFS, which enables us to mount a remote server’s file system locally through SSH without the need for any additional file-sharing services such as NFS or Samba.

As this tool is separate from SSH, it usually isn’t installed by default on most distros. This can be resolved with yum install fuse-sshfs on Red Hat-based systems or apt install sshfs on Debian systems.

Once SSHFS is installed on the client, we should first create a mount point (ex. mkdir /mnt/mymountdir).

We then mount the remote target to our client PC. In its simplest form using the client and server examples mentioned above, the command would be as follows –

sshfs root@SERVERPC:/ /mnt/mymountdir/

This particular example enables us to mount an entire remote system to our client. However, we could also tailor our command to mount a more narrow portion of our filesystem such as a user’s home directory, if needed.

Once we’re done, we can unmount the filesystem with umount /mnt/mymountdir/ , as we would for any other mounted filesystem.

Though we’ll be prompted for a password in the example provided above, key-based authentication can be configured for SSHFS as well. Using this sort of authentication would also allow us to use SSHFS with the /etc/fstab file to automatically mount a filesystem at boot time, allowing for persistent file sharing over a local network or the Internet on any system supporting the SSH protocol.


Linux From Scratch: Fun, Rewarding, Occasionally Confusing. (Parts 1-2)

The authors of Linux from Scratch (LFS) recently celebrated the release of version 8.4 of their book on constructing a working Linux system entirely from source code. I’ve been meaning to dive into this project for a while and figured this would be a good chance to provide a first-hand report of my experiences.

Linux from Scratch is an excellent educational opportunity at a time when desktop Linux is continually becoming more user-friendly and abstracted through a never-ending stream of window managers and desktop environments disguising its internals. Gone are the days of Ncurses (or text mode) installers and arcane error messages; most mainstream distributions are as quick and simple as a Windows or OS X install. Though this is welcome in a practical sense, we lose the customizability and insight we once had in configuring a system from its component parts.

Conversely, LFS deals in the business of compiling, configuring, and text-file editing, stripping away the creature conveniences of a desktop-oriented distro. Even the source packages themselves are manually downloaded using wget – we’re provided only with a package list and instructions to gather them from the appropriate locations.

The familiarity the reader gains with the Linux command-line ecosystem as a result of this manual configuration process is one of LFS’s major strengths. Even as a veteran Linux desktop user, there are many components with which most of us will never interact on a day-to-day basis. Non-developers don’t need to care about GCC, correct? What even IS binutils? No need to worry, this book will answer these questions in more-than-sufficient detail.

There’s also a large amount of insight to be gained on the structural challenges of the build process. The reader will learn of concepts such as circular dependencies (“to compile a compiler, you need a compiler”) and testing package compilation to ensure the preceding configuration was completed correctly. Additionally, the book discusses multiple “passes” or iterations of package builds as the associated toolchain and libraries change. Our first passes pull from the host system entirely, while later passes incorporate libraries and tools built to comprise part of the eventual LFS system. As a significant portion of the packages installed are themselves an essential part of the build process, we get to see how they function and rely on each other along the way.

LFS is also a great tool to help differentiate the core and commonalities of Linux vs. the GNU/userspace utilities and extra functionality and differences afforded between the myriad desktop distributions. It makes it easier to understand the absolute essentials of a Linux system, as well as the niceties and redundancies that can be otherwise dispatched based on the user’s needs. Like the vast majority of distributions, LFS follows the POSIX standard (for system design), FHS (for a unified filesystem hierarchy), and LSB (for core Linux components – Core, Desktop, Runtime Languages, and Imaging).

As a foreword, it’ll quickly become apparent that this isn’t a good project for an absolute Linux beginner. Some working knowledge of basic file management commands (cd, ls, rm, mv, cp, and tar, for instance) will be required, as well as a bit of intuitive knowledge of why errors can occur. The project is well-supported through mailing lists and IRC (irc.freenode.net #LFS-support), and I was able to easily get help for any issues I saw, but there were also a few minor problems that I was able to solve on my own. I’ve left most of these out of these examples, as they usually related to typos (my own – the book is impeccably edited), forgetting to set environment variables, or executing commands from an improper directory for the task.

Additionally, due to the length of this process and number of steps involved, it’s difficult to write about this project without it seeming like a log. I’ll try and avoid this where possible, and won’t be including much in the way of commands/output. Please don’t think of these articles as an instructional guide – the LFS book is the go-to resource, and its processes should be followed verbatim.

The book is issued in versions for both the sysvinit and systemd init systems, but I will be working with the latter due to its widespread adoption within most modern distributions. I should also note that there are PDF and HTML versions of the text. Having experience with both, I’d recommend the HTML route, as the commands can be a little more difficult to copy-and-paste from the PDF version.

I will be building x86_64 “pure” with no 32-bit support, though there are also instructions available for PowerPC and ARM. My host system (or VM, more accurately) is running Ubuntu Server 18.04 .

Polishing Up The Host

LFS is cross-compiled from an existing Linux distribution. As the build process progresses, the new Linux system is gradually separated from its host environment until it reaches the point of being bootable on its own.

With this in mind, ensuring the host’s software packages are up to date is an important first step to building an LFS system. Fortunately, the author includes a quick version-checking script included at the beginning of the book’s second chapter to ensure the host machine is up to speed.

I ran this script on my host and received the following results –

bash, version 4.4.19(1)-release

/bin/sh -> /bin/dash

ERROR: /bin/sh does not point to bash

Binutils: (GNU Binutils for Ubuntu) 2.30

bison (GNU Bison) 3.0.4

/usr/bin/yacc -> /usr/bin/bison.yacc

bzip2, Version 1.0.6, 6-Sept-2010.

Coreutils: 8.28

diff (GNU diffutils) 3.6

find (GNU findutils) 4.7.0-git

GNU Awk 4.1.4, API: 1.1 (GNU MPFR 4.0.1, GNU MP 6.1.2)

/usr/bin/awk -> /usr/bin/gawk

gcc (Ubuntu 7.3.0-27ubuntu1~18.04) 7.3.0

./version-check.sh: line 31: g++: command not found

(Ubuntu GLIBC 2.27-3ubuntu1) 2.27

grep (GNU grep) 3.1

gzip 1.6

Linux version 4.15.0-45-generic (buildd@lgw01-amd64-031) (gcc version 7.3.0 (Ubuntu 7.3.0-16ubuntu3)) #48-Ubuntu SMP Tue Jan 29 16:28:13 UTC 2019

m4 (GNU M4) 1.4.18

GNU Make 4.1

GNU patch 2.7.6

Perl version=’5.26.1′;

Python 3.6.7

sed (GNU sed) 4.4

tar (GNU tar) 1.29

./version-check.sh: line 43: makeinfo: command not found

xz (XZ Utils) 5.2.2

./version-check.sh: line 45: g++: command not found

g++ compilation failed

The fun begins! Most of our software is up to date version-wise, but a few important dependencies are missing.

Believe it or not, the alias of /bin/sh to /bin/dash isn’t a typo – dash is a shell used in modern Debian/Ubuntu derivatives as a quicker bash replacement. However, we’re required to fix the symbolic link to point to /bin/bash for the purpose of building LFS.

root@menikmati:~# rm /bin/sh

root@menikmati:~# ln -s /bin/bash /bin/sh

We’re also missing g++ and makeinfo. These dependencies were resolved with the apt install g++ and apt install texinfo commands, respectively.

A bare minimum install of LFS is around 6GB, though it’ll be helpful to have some extra space handy when building our system. Though the book goes into creating multiple partitions and mount points (root, /home, /boot, etc.), I settled for a single root partition of 15GB and a 2GB swap partition, as I don’t require the system for day-to-day use and wanted to keep the partition layout as simple as possible. I then formatted and mounted both partitions.

Next, the LFS enviroment variable is set. This variable points to the folder in which LFS will be built on the host system. In my case, I had previously mounted my new root partition to /mnt/LFS, and set the environment variable to reflect this location.

With all that out of the way, it’s time to download packages! LFS recommends specific version numbers and provides a handy wget-list for the purpose. This took about 3 minutes on my test VM over Wi-Fi.

Once the packages are downloaded, we finalize our preparation by creating a tools directory within our LFS directory and symlinking it to /tools. To prevent accidental changes to the host system, a lfs user is created and given ownership of the LFS directories. Environment variables are added to the lfs user’s .bashrc and .bash_profile to support the build process.

First Builds

As build time can vary drastically depending on the host system, LFS uses a term called SBU (Standard Build Unit) to express how long a package takes to compile and install. binutils (the first package to be installed) takes 1 SBU to complete. The binutils build is timed by the user, then all other build times in the book are listed relative to the build time for binutils.

The instructions also touch upon “test suites” – a set of checks to determine a package built and installed itself correctly. These are largely skipped in this section, as dependencies are not yet in place for most of the tests.

As mentioned in the introduction, we start by building a minimal system and toolchain to construct a final LFS system. The toolchain includes a compiler, assembler, linker, libraries, and utilities that are used to build the other tools. This toolchain is isolated from the eventual “final” system and stored in $LFS/tools.

Before we begin building packages, we need to identify our “Target Triplet” or name of the working platform. We’ll also need the name of the platform’s dynamic linker/loader, not to be confused with the standard linker (ld) that is part of binutils. For my 64-bit system, this should be ld-linux-x86-64.so.2, though you can check with readelf -l <name of binary> | grep interpreter.

Our first packages are binutils (a cross-linker) and GCC (a cross-compiler). Temporary libraries are cross-compiled, while we also set the GCC source to tell the compiler which target dynamic linker will be used.

It was at this point that I hit my first challenge of the project, as GCC failed to build properly due to a missed option in the pre-build configuration process. After racking my brain with no success, I reached out to the #lfs-support channel on Freenode and promptly got the help I needed.

Next, the sanitized Linux API headers are installed, allowing Glibc to interface with the features the kernel will provide.

Glibc is then installed, referencing the compiler, binary tools, and kernel headers already present.

This is followed by a second pass of binutils referencing the proper library search path to be used by ld. I hit another snag at this point, as I failed to alias /tools/lib to /tools/lib64. In this case, I was able to identify and resolve the issue by searching the linuxquestions.org message board.

GCC then sees a second pass with its sources modified to reference the newly-installed dynamic linker rather than the one present on the host system. Once this is complete, the core toolchain is self-contained and self-hosted and is no longer reliant on the host.

From here, we build a series of utilties – TCL, Expect, DejaGNU, NCurses, bash, bison, nzip2, coreutils, diffutils, file, Findutils, gawk, gettext, grep, gzip, make, patch, perl, python, sed, tar, and xz. These all installed smoothly without much in the way of additional configuraton.

Once the packages are installed, we then strip unneeded debugging symbols, documentation, and temporary build directories to reclaim disk space.

Finally, ownership permissions for the $LFS/tools directory are assigned to the root user, as our work with the lfs user is complete. My next article will cover Part III of LFS, in which we chroot into the new system and use our toolchain to continue building the LFS system.